
MagnetoSpeed Chronographs: Barrel-Mounted Accuracy for Every Shooter


What if the number your chronograph shows you is wrong before it even factors in lighting, alignment, or wind? Barrel-mounted chronographs like the MagnetoSpeed solve that problem at the source. Here’s how they work, who they’re built for, and how to get the most out of them.
Why Measuring at the Muzzle Changes Everything
Traditional optical chronographs measure velocity downrange. The bullet has already traveled several feet, passed through whatever light conditions exist that day, and crossed two sensor windows that need to be perfectly aligned. There are a lot of places for that system to go wrong.
MagnetoSpeed takes a different approach: measure the bullet right at the muzzle, the instant it leaves the barrel. No light gates, no tripods, no fussing with alignment 10 feet downrange. The result is cleaner data, fewer wasted strings, and velocity numbers you can actually trust to feed your ballistic solver.
This article covers how MagnetoSpeed technology works under the hood, the practical advantages it has over optical setups, how to choose the right model for your shooting style, and how to turn raw velocity data into real performance gains at the bench and in the field.
1. How MagnetoSpeed Chronographs Work
The simple version
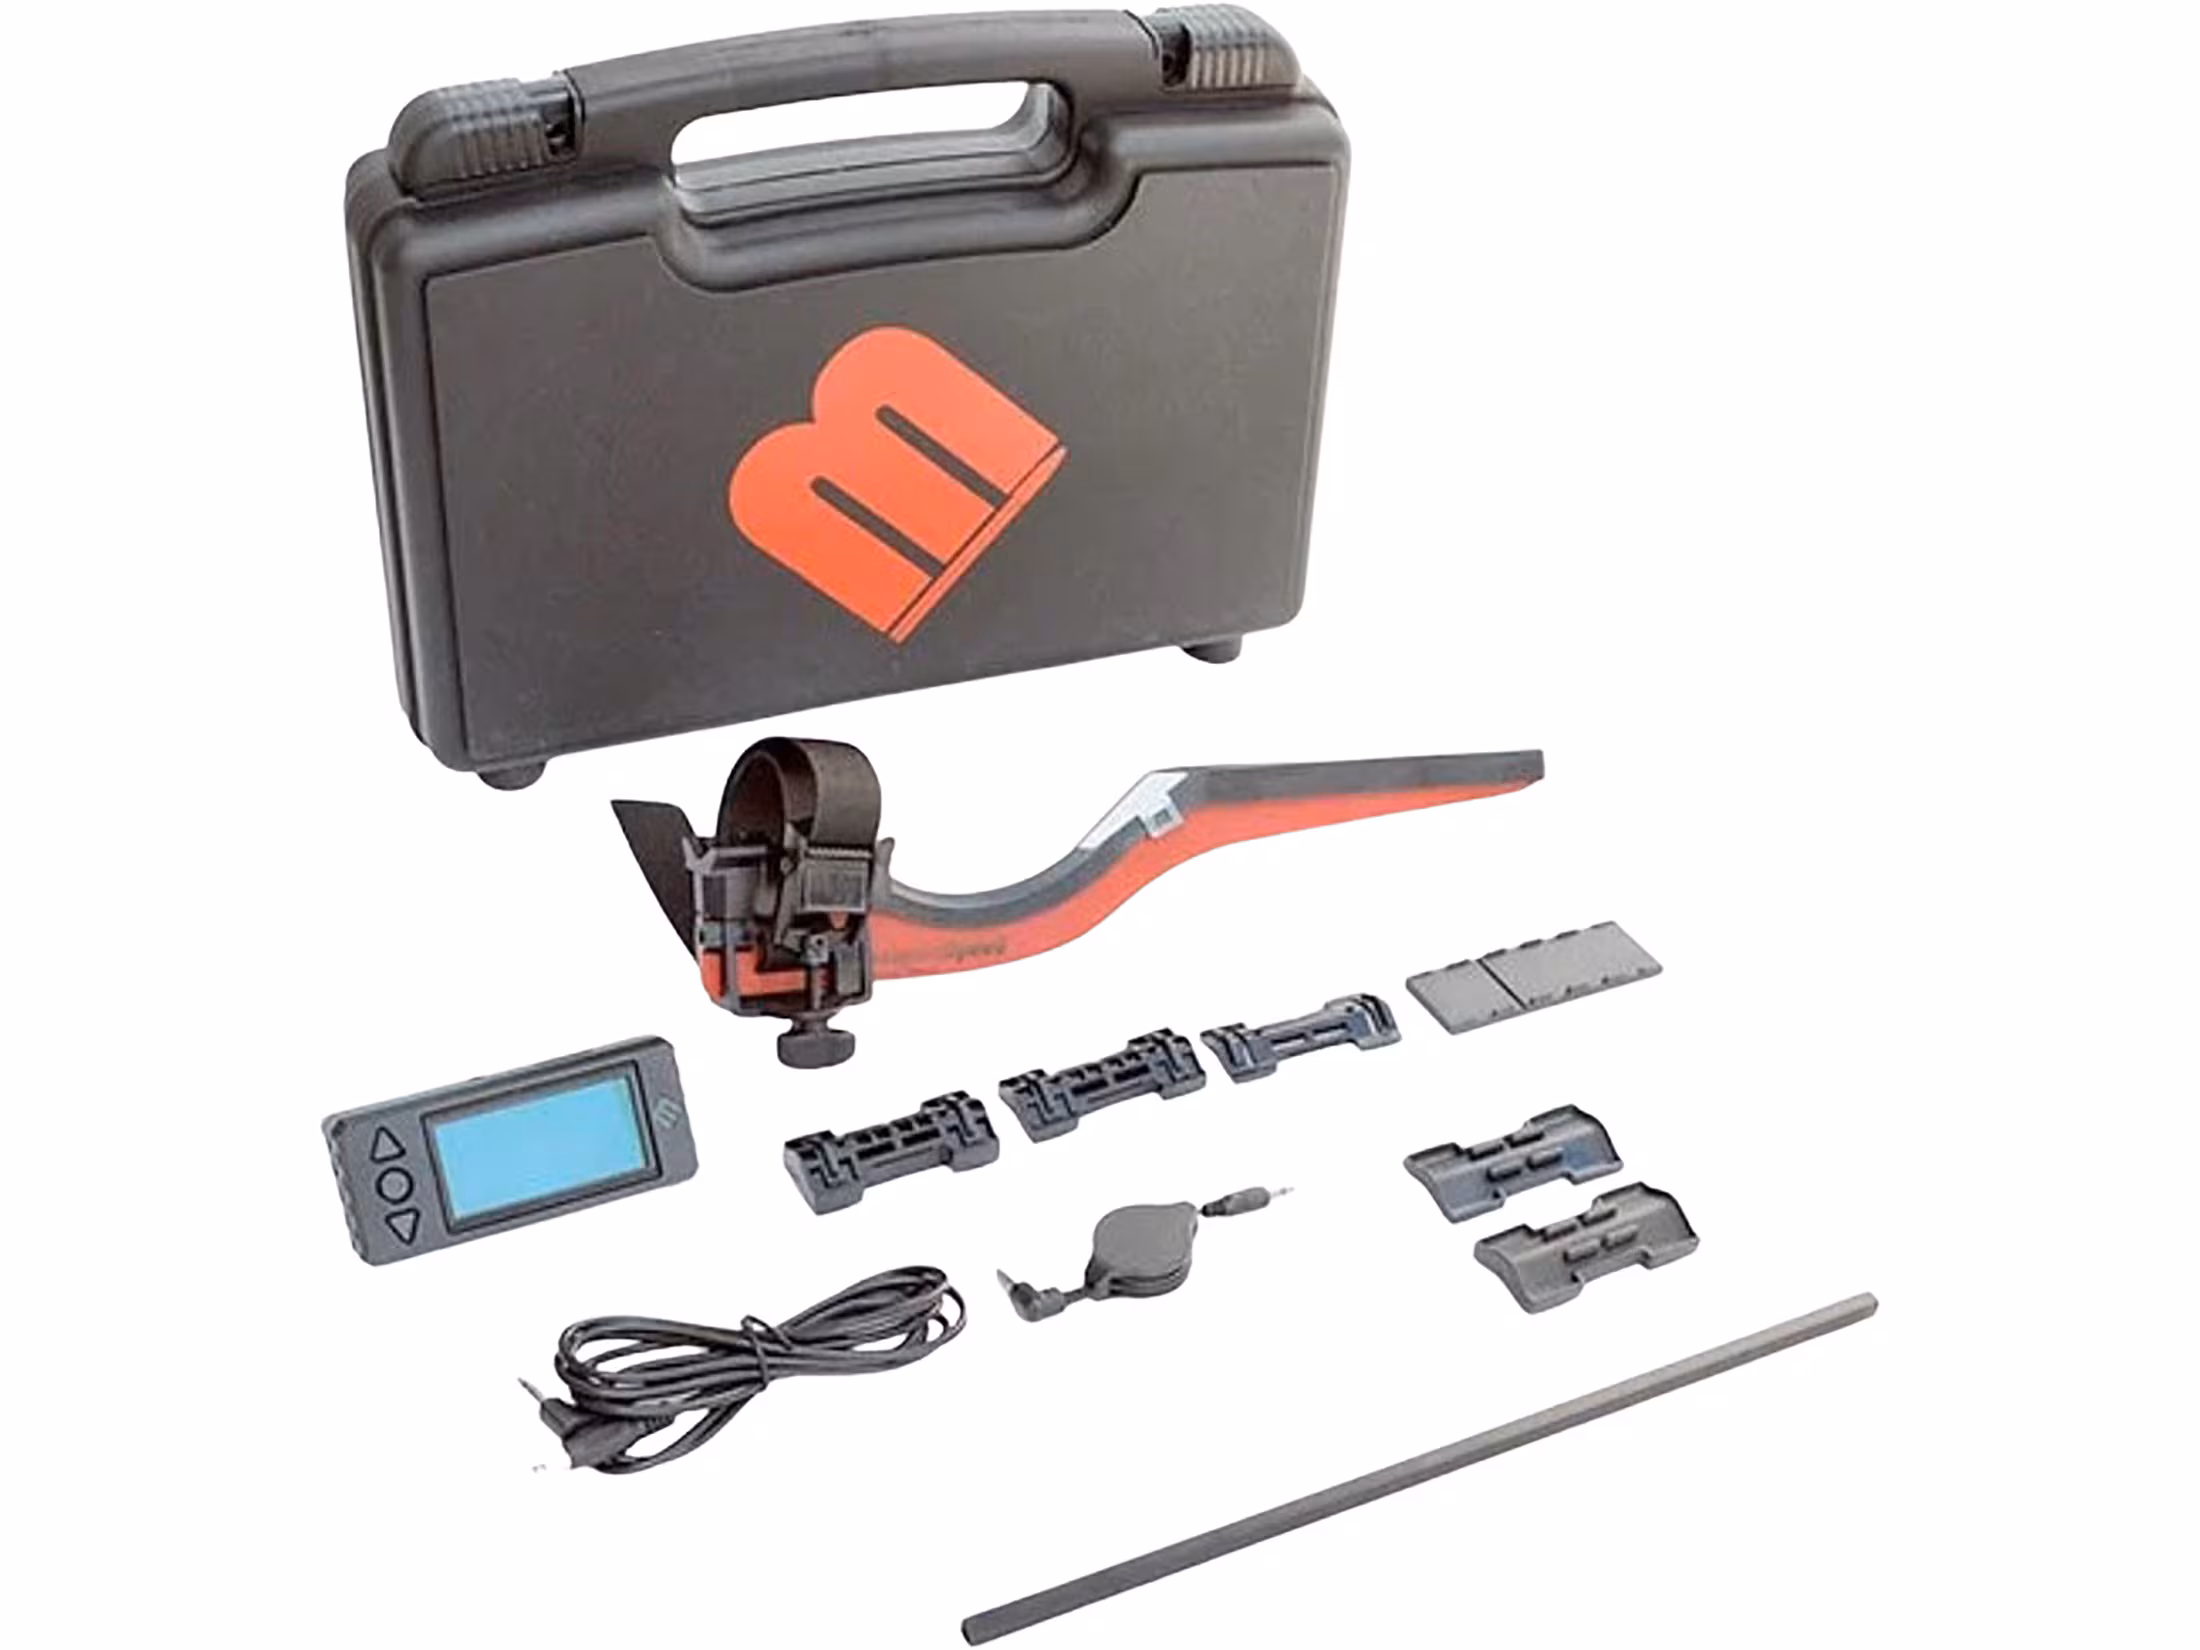
A MagnetoSpeed chronograph clamps onto the barrel just forward of the action and listens for the bullet instead of watching for it. As the bullet passes through the sensor array, it disturbs the local magnetic field and creates a brief electrical pulse. Two sensors spaced a known distance apart register two pulses. Velocity is distance divided by time – simple physics, measured to microsecond precision.
What’s happening inside the unit
Each sensor generates a voltage spike when the bullet passes. Onboard electronics filter out noise from muzzle blast and echoes, identify the true signal peaks, timestamp each one, and calculate velocity. Because the sensors are physically on the barrel, you’re measuring velocity exactly at the muzzle – before wind, distance, or optical conditions can introduce any error at all.
How this compares to optical units
Optical chronographs use two light gates positioned downrange and can be tripped up by shadows, direct sunlight, misaligned shots, or a bug flying through at the wrong moment. Barrel-mounted units bypass all of that. You get cleaner strings, fewer missed shots, and data you don’t have to second-guess.
What data you get
- Single-shot velocities for every round fired
- Full velocity strings with shot-by-shot breakdown
- Average (mean) velocity, Extreme Spread (ES), and Standard Deviation (SD)
- Time-stamped shot records on most models
- Bluetooth export to phone apps on V3 and Sporter models
What you can’t expect from it
MagnetoSpeed is a velocity tool, not a ballistic computer. It won’t give you downrange velocity, real-time ballistic coefficient, or spin data. Very thin polymer-tipped projectiles or non-conductive sabots can produce weaker signals on some units. If you need BC measurements, you’ll need to combine muzzle velocity data with downrange impact data separately.
2. The Real-World Advantages of Barrel-Mounted Design
Your range kit gets a lot smaller
Ditch the tripod, the light screens, the mat, the extra battery box. A MagnetoSpeed V3 or Sporter drops into your rifle case and takes about a minute to mount. When you’re done, it comes off just as fast. For hunters running loads before a backcountry trip, or competitive shooters at a crowded club range where laying out optical skyscreens isn’t practical, that portability is a genuine advantage – not just a nice-to-have.
It works in conditions where optical units fall apart
Optical skyscreens have a long list of enemies: direct sunlight, low light, glare, shadows, dust, and muzzle blast reflections. Barrel-mounted units don’t care about any of that. You can chronograph at dawn with the sun at a low angle, in the middle of a dusty range, or at a short private-property setup where you can’t run a proper optical lane. The readings stay consistent.
Works across different barrel profiles and muzzle devices
With the right clamp and spacers, MagnetoSpeed units work on short barrels and long ones, light contours and heavy contours, with muzzle brakes and suppressors. The magnetic disturbance happens the instant the bullet exits, so neither a brake nor a suppressor interferes with the timing. If you’ve ever tried to chronograph a suppressed rifle with an optical unit and dealt with blast and reflection errors, you know how much that matters.
How shooters actually use it
- Load development: run 5-10-shot strings, compare mean, ES, and SD across different powder charges or seating depths to find the most consistent node
- Hunting prep: verify your load stays supersonic to your maximum ethical distance and confirm your zero holds at field temperatures
- Match tuning: identify powder lots or seating depths that drop your SD from double digits into single digits – that’s fewer vertical flyers on target
Quick habit worth building: record barrel temperature and length with every string. Temperature affects velocity more than most shooters expect, and that data becomes useful when you’re comparing strings across sessions.
3. Choosing the Right MagnetoSpeed for Your Shooting
The key factors to think through
MagnetoSpeed makes a few different models, and the right one depends on how you actually shoot – not on which one has the most features on paper.
- Compact vs. full-featured: Sporter-style units are smaller and faster to pack for a hunt; V3-style units have richer displays and more built-in features for serious range work
- Barrel and muzzle compatibility: check clamp fit and included spacers before you buy – heavy-contour, tapered, or threaded barrels may need different spacing; large muzzle brakes or suppressors require confirming the sensor placement clears the device
- Display vs. Bluetooth: a remote display is faster to read on a cold morning with gloves on; Bluetooth lets you log and tag strings for later analysis on your phone
- Data needs: shot-string capture and SD logging matter most for handload development; casual velocity checks can get by with basic readouts
Matching models to shooting goals
Handloading and load development: go with a full-featured V3 with Bluetooth logging and a remote display. You want shot-string capture, easy tagging, and integration with ballistic apps.
Precision rifle competition (PRS/NRL): V3 or equivalent with robust logging and a clear remote display so your spotter or coach can read velocity at the line. A durable clamp and quick-remount capability matter here.
Hunting and backcountry use: Sporter-style unit or a V3 without bulky accessories. Light weight, quick on/off, and simple Bluetooth logging to your phone are the priorities.
Casual range work and plinking: a basic Sporter keeps costs down while still giving you muzzle-true numbers. You don’t need per-shot logging for a fun range day.
Four questions to answer before buying
- Will I mostly use this in the field or on a formal range?
- Do I need per-shot logging and app integration, or just quick readouts?
- What barrel profile and muzzle devices do I run?
- Do I want a physical display I can read with gloves on?
Answer those four questions and you’ll land on the right model without paying for features you’ll never use.

4. Setup and Best Practices – Getting Reliable Readings Every Time
Safe mounting first
Clear the rifle, drop the magazine, and point it in a safe direction before you touch the clamp. Fit the clamp on a clean, straight section of barrel with no fouling, tape, or soft coatings. Tighten progressively and evenly until the unit is snug with zero rotation or wobble. Use the included spacers if your barrel is tapered or heavy-contour.
Getting placement right
Mount the sensor where the bullet passes closest to the sensor housing on a straight section of barrel – for most rifles, that’s a few inches forward of the action. If you’re running a brake or suppressor, use MagnetoSpeed’s spacing accessories to position the sensor where it won’t contact the device. You want the bullet passing roughly centered alongside the sensor – lateral offset causes missed shots or weak triggers. Keep ferrous objects away from the sensor area.
Verify before you commit to a full string
Check batteries, confirm the app connection or remote display is live, then fire a single test round and look for a clean, plausible velocity reading. If the first shot is missing or wildly off, re-check clamp tightness and position before shooting more. One verification shot saves a lot of wasted ammo and frustration.
Running strings the right way
For meaningful SD and ES numbers, shoot at least 5-10 rounds per string – 10 is better. Keep a consistent cadence of 15-30 seconds between shots and let the barrel cool between strings. Temperature changes affect velocity, and a hot barrel will skew your numbers in ways that are hard to interpret later. Use Bluetooth logging to tag strings with load details and environmental notes while you’re still at the bench.
Troubleshooting the most common issues
- False or spurious readings: re-seat the clamp, remove nearby magnetic objects, check firmware
- Missed shots: sensor misalignment or a loose clamp – reposition and run a verification string
- App or display issues: check phone permissions, wake the app from sleep mode, and confirm battery level before writing off a reading as a hardware problem
- Outlier shots that don’t make sense: repeat the string immediately – a clamp that crept loose after a few shots is the most common culprit
5. Turning Velocity Data Into Real Performance Gains
What the numbers are actually telling you
Average velocity is the number your ballistic solver needs. Feed it the accurate muzzle velocity from a proper 10-shot string and your drop predictions get a lot more reliable.
Extreme Spread (ES) is max minus min velocity in a string. High ES points to inconsistent components, seating depth issues, or ignition problems. A useful ballpark: ES under 40 fps is generally acceptable; consistently higher than that and something needs attention.
Standard Deviation (SD) measures shot-to-shot scatter. Lower SD correlates directly with tighter groups and more predictable impact at distance. Practical targets: SD under 10 fps for hunting loads, under 5 fps for match-grade work.
How to use the data during load development
- If SD improves when you switch primer brand or brass lot, standardize that component – it’s clearly making a difference
- If moving seating depth 0.005″ reduces SD and tightens groups, keep refining in smaller increments
- For powder charge tuning, try ±0.2-0.5 grain increments and watch SD trends across strings, not individual shot velocities
Using your data with ballistic apps
Input your MagnetoSpeed average muzzle velocity into your solver of choice – Applied Ballistics, Strelok Pro, whatever you run – along with local atmospheric data. Then validate by shooting at a known distance, comparing actual impact to the predicted drop, and adjusting your BC until reality matches prediction. That’s how you dial in a first-round hit solution that actually holds in the field.
Watch for patterns over time
Always log temperature, elevation, and humidity with each string. Higher altitude and temperature both reduce air density and flatten trajectory at the same muzzle velocity. If you see velocity climbing shot-by-shot within a string, that’s barrel heating. A sudden jump mid-string usually points to a loose clamp or a seating anomaly worth investigating.
Three experiments worth running
- Baseline string: 10 shots at consistent cadence to establish your true SD for a given load
- Ladder test: vary seating depth in 0.005″ steps, run a 5-shot string at each increment, find the node where SD drops and groups tighten
- Component swap test: change exactly one variable – primer, brass, or powder lot – and compare SD/ES against your baseline
6. Maintenance, Common Issues, and Advanced Tips
Pre-range checklist
Keep it simple and do it every time before you leave the house:
- Batteries charged or fresh spares packed
- Firmware up to date (check MagnetoSpeed’s support page when you think of it, not just before a match)
- Quick visual inspection of the clamp, pads, and any small screws
- Backup any stored logs before updating firmware – just a good habit
Keeping the sensor clean and protected
Carbon buildup and physical impacts are the two things that shorten the life of any barrel-mounted unit. After a shooting session, wipe the sensor and clamp with a soft dry cloth and use a small brush or compressed air for carbon. Use the protective cap or a foam sleeve during transport. Keep a few spare clamp pads and screws in your range bag – a dropped screw is an easy way to cut a session short.
Working with muzzle brakes and suppressors
Muzzle devices change the local mass and harmonics around the muzzle and can affect readings if the sensor is positioned too close. Test with and without the device when you first set up a new combination, and compare SD and ES. If readings stay inconsistent, try moving the sensor forward or back in small increments and run short verification strings at each position. For suppressor users specifically, if you can’t get stable readings, a radar-based unit like LabRadar is the cleaner cross-check option.
Integrating your data for the long haul
Export your shot strings to a spreadsheet – Google Sheets works fine – and tag each row with component details, temperature, and shot number. Patterns that don’t show up in a single range trip become obvious when you can look at 20 sessions side by side. For high-stakes load validation, a cross-check with a second system (LabRadar or a second MagnetoSpeed at a club) confirms that your data is solid before you commit to a final load.
Making Every Range Trip Count
Measuring at the muzzle removes a whole category of variables that plague optical setups. The data you get from a MagnetoSpeed is cleaner, more consistent, and more immediately actionable – whether you’re dialing in a hunting load for elk season, chasing single-digit SD for a PRS match, or just trying to understand why one powder charge shoots better than another.
Set up consistently, log your environmental data, and treat every range session as a structured experiment rather than just sending rounds downrange. The information is already there in your strings – you just need to know what to look for.
Frequently Asked Questions
How does MagnetoSpeed work differently from an optical chronograph?
An optical chronograph uses two light gates positioned downrange and relies on the bullet breaking a light beam as it passes – which means it can be tripped up by sunlight, shadows, misalignment, or anything else that affects light in that zone. MagnetoSpeed clamps directly to the barrel and detects the magnetic disturbance the bullet creates as it exits the muzzle. No light gates, no tripods, no alignment challenges. The result is cleaner readings with far fewer missed or false shots, especially in variable lighting conditions.
Will a MagnetoSpeed work with a suppressor or muzzle brake?
Yes, in most cases. The magnetic detection happens at the moment the bullet exits, so the presence of a muzzle brake or suppressor doesn’t interfere with the timing itself. The main thing to manage is sensor placement – you need to position the clamp where it won’t make contact with or sit too close to the device. MagnetoSpeed includes spacing accessories for this, and their setup guide covers the recommended positions for common muzzle devices. If you’re getting inconsistent readings despite proper placement, try shifting the sensor position slightly and running a short verification string.
Does a MagnetoSpeed affect barrel harmonics or point of impact?
It can – and this is the most common honest criticism of barrel-mounted chronographs. Adding mass to the barrel changes its harmonic resonance, which can shift your point of impact slightly. In practice, most shooters find the shift is small and consistent enough to account for. If you’re doing serious precision load development, the best practice is to run your load development with the MagnetoSpeed mounted (since that’s how you’re measuring it) and do your final zero and confirmation shots with it removed. Some shooters also cross-check a few strings against a LabRadar specifically to get velocity data without any barrel contact.
What’s the difference between the MagnetoSpeed V3 and the Sporter?
The V3 is the more full-featured unit – it has a larger built-in display, more data logging capability, Bluetooth connectivity for app integration, and a more robust build for heavy range use. The Sporter is more compact and lighter, making it a better fit for hunting, backcountry use, or shooters who just want quick muzzle velocity readings without a lot of extra features. Both give you accurate muzzle velocity, SD, ES, and string averages. The choice comes down to whether you need deep data logging and app connectivity (V3) or compact portability (Sporter).
How many shots do I need for a meaningful standard deviation reading?
Ten shots per string is the practical standard for meaningful SD. Five shots gives you a rough velocity check – useful for quick confirmation but statistically too thin to draw conclusions from. For serious load development, shoot three separate 10-shot strings and compare SD across all three. This filters out heat effects, seating anomalies, and string-to-string variation so you’re seeing what your load actually does rather than what it happened to do on one particular string.
Can I use MagnetoSpeed data directly with ballistic apps like Applied Ballistics or Strelok?
Yes, and this is one of the most practical use cases for the system. Input your average muzzle velocity from a proper 10-shot string into your ballistic solver along with local atmospheric data – elevation, temperature, humidity – and your bullet’s known BC. Then validate by shooting at a known distance and comparing your actual impact point to the predicted drop. Adjust BC in the app until prediction matches reality, and you have a first-round hit solution built on real measured data rather than published factory specs. The V3’s Bluetooth export makes this workflow even faster by logging strings directly to your phone.


Comments are closed.